Previously I blocked in and picked some basic circuit designs for the Attack part of the AR module, and we learned some things looking at how the ARP2600 handled envelope generation. This time we’re going to expand the ‘control logic block’ to control when the capacitor is charging and discharging. Also I’ve picked out a few component values and calculated the range of control voltages and the range of charging currents and it looks like modifications will be needed. And lastly there’ll be a bit about the release block.
Controls
Last time we decided to ditching trying to time things and just use input and feedback control to enable charging the output capacitor. First the conditions for enabling the attack current source need to be described. The attack current source should be enabled if the Gate input signal is high and the output of the module is below the output set point. In circuit form that’s going to look something like this.

A comparator compares the current output with the setpoint. If the setpoint is higher than the output the comparator outputs a logic high value. If the gate is also high the AND gate outputs high and the Attack current source is enabled. A feedback resistor may need to be added to the comparator to prevent rapid toggling thus making the comparator a Schmitt Trigger. I also would like to note that this control set up will ‘top up’ the output capacitor if the gate is especially long and the capacitor begins to self discharge.
Math
This brings us to the part of the design where we need to pick some component values and transition times and start doing math to see if other component values are reasonable. Here are the initial choices.
| Output Capacitor (C) | 10 µF |
| Charge time min (tmin) | 1 ms |
| Charge time max (tmax) | 10 s |
| Output Voltage minimum (Vmin) | 0 V |
| Output Voltage maximum (Vmax) | 5 V |
Now using the terminal equation for a capacitor
I = C dV/dt
and the input voltage output current relationship for the current source
Iout = 1/R * (Vcc – Vin)

The minimum and maximum charging currents and control voltages can be calculated.
| Charge Time | Iout | Vin |
| 1 ms | 50 mA | 2 V |
| 10 ms | 5 mA | 11.9 V |
| 1 s | 50 µA | 11.99 V |
| 10 s | 5 µA | 11.999 V |
Current Range
The output current range seems ok. 5 µA is on the small side, but we’ll have to actually build a prototype to see if it’s too small to work.
Voltage Range
The range for Vin however is immediately problematic for two reasons that require circuit adjustments.
First in order to have a long attack time Vin needs to be approximately the same as Vcc (on the order of 1 mV), and having inputs and outputs of an op amp at either of the power rails tends to cause unpredictable behavior. The ‘rail to rail’ op amps I usually use recommend operating 25 mV to 1 V from the rail for ideal performance. Additionally output current is related to the difference between Vcc and Vin. Vin is controlled and Vcc is 12 V, or is it? Vcc could be higher or lower depending on the power supply and the power input protection. The typical power input block I use for circuit protection and power filtering can drop the input voltage 10’s of mV. So referencing the control current to Vcc is going to cause unpredictable behavior.
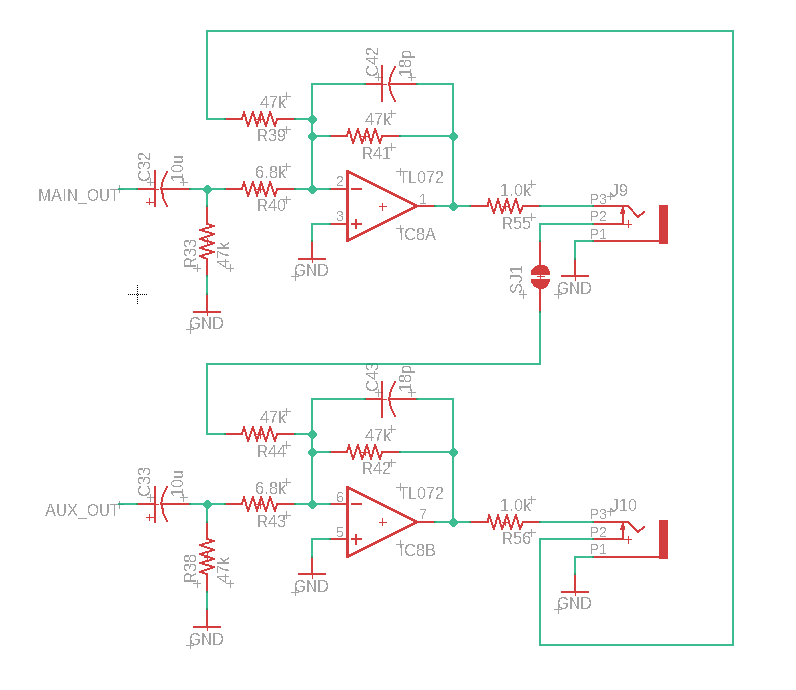
So I’m swapping the current source for this one, which uses sources a current proportional to Vin, and has the added benefit of acting as a current sink, so an identical set up can be used as part of the release stage. A limiting factor here will be the maximum current output of the op amps and 50 mA is getting up there.

The second issue is that charge time and by extension input voltage covers 4 orders of magnitude. The table shows that input voltage difference between 1 s attack time and 10 s attack time is 9 mV while . So as is more of the input space for the module is devoted to short attack (and by extension release) times. This use of the input space is backwards to human perception that is it’s easier for humans to notice the difference between 1 s and 10 s than it is for us to notice the difference between 1 ms and 10 ms. So we want to convert a linear voltage input into an exponential voltage input to better match the control voltage to attack time to human perception. Fortunately there’s a pretty typical circuit for that.

Release block
At this point the release block is super easy. It’ll be identical to the Attack block with the following changes. The input voltage to the current source needs to be negative to make it a current sink. The control logic needs to be inverted. That is on when the gate signal is low and the output voltage is above 0 V.


